The Arrangement Window

The Transport Bar
What follows is an outline of the knowledge of Cubase VST mixing functions I have been able to glean from a few periods of trial operation. The real-time DSP capabilities of the program distinguish it as outstanding for mixing applications, whereas Cool Edit Pro offers unsurpassed functionality in the area of digital audio editing.
Preparing the tracks
Assuming you have recorded your tracks in another program such as Cool Edit Pro, the tracks should be left untrimmed, or trimmed at the head by an equal number of samples for each track. This is important, as Cubase does not permit you to cue tracks with sample accuracy, but rather to only within 1/10th of a second (4,410 samples at CD standard). You can of course do any sort of processing to the tracks prior to mixing, provided this one guideline is observed. In particular, you may wish to silence the intervening passages where no important sound is present in your tracks, so as to avoid the need for noise gates in the mix. However, the primary aims of mixing tracks in Cubase using the real-time digital signal processing functions, as opposed to mixing in CEP without real-time DSP, are to increase flexibility and to reduce the amount of time spent preparing for the mix. As such, processing in the CEP editor should be kept to a minimum for this purpose.
Top
Preparing Cubase VST for a mix
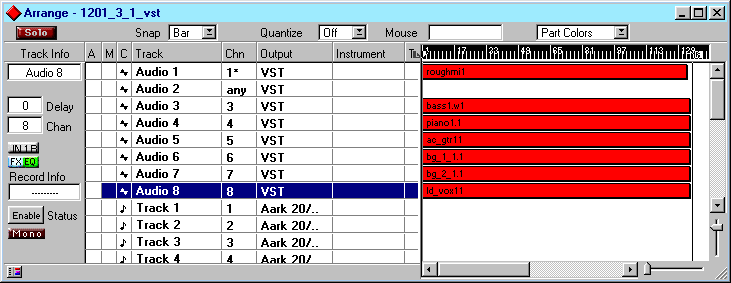
Upon opening Cubase, you should see at least two components, the Arrangement (Arrange) Window and the Transport Bar. If these are not showing, they may be selected from the Windows menu.
Select System from the Audio menu. Double-click the text field corresponding to Number of Channels and type the number of tracks you will be using. This can be revised at any time. While the Audio System Setup dialog is open, ensure that the other settings are to your satisfaction. There may be parameters which you do not understand; leave these at the default settings as long as everything works properly. When you have finished, click Apply, then click OK.

In the Arrangement Window, click the box in the topmost horizontal row, in the vertical column marked C. Select Audio Track from the pop-up menu. Double-click the box in the Track column if you wish to change the name of the track. Repeat this process for every track you intend to use for audio.
Next, highlight Audio 1 (or whatever the track is now called, if you have renamed it) by clicking on its row in the Arrangement window. From the File menu, select Import Audio File. Browse for the audio file you wish to use as Audio 1, and open it. Repeat this process until you have imported all the files you intend to use in the mix.
Click the box in the Chn column for each audio track to assign the track to a channel on the VST Mixer. Repeat this process for each track, assigning each track to a different channel. If you find the number of available channels to be insufficient, go back to Audio System Setup and revise the number of channels, remembering to click the Apply button.
Top
Begin mixing
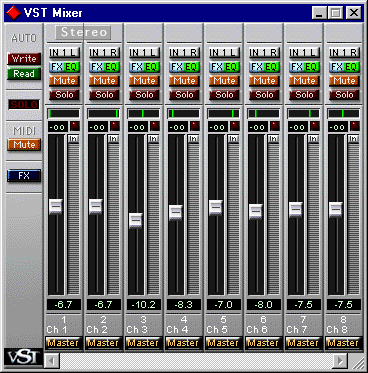
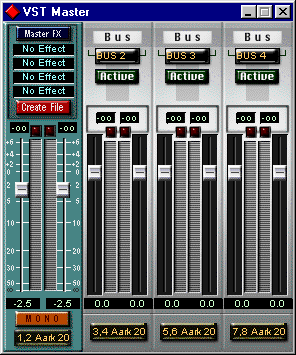
At this point the Arrangement Window may be minimized. Open both the VST Mixer (Monitor) and VST Master (Master) from the Audio menu. In the Mixer you should see controls for the number of channels you selected in the Audio System Setup dialog. If some are obscured, simply drag the edge of the window until they all appear. The Master window should contain a stereo master control module for the primary output device and stereo buses for each of the remaining active output devices. If you are using a single stereo output device there will be no need for any of the buses to be active.
In the Transport Bar, move the slider full left to the start position. Press the green Play button to begin playback. If you hear the metronome click, deactivate it by pressing the Click button. If you hear nothing at all, refer to the Troubleshooting section of this article.
Use the channel faders in the Mixer to adjust the relative volume of each track. Avoid peak levels going into the red in the meters. The pan controls are the small horizontal black bars above each fader, in which the vertical green lines indicate the position of the track in the stereo field. Set the Master volume so that peaks reach about -1 dB. Each channel also provides for mute and solo functions. Adjustments to all parameters can be done in real-time while mixing, with a certain unavoidable period of latency (up to about 1 second).
Top
Effects and Equalization
The real-time DSP functions are what Cubase VST is all about. There can be no substitute for the ability to hear the results of changes you make to the mix while the tracks are actually playing.Near the top of each channel module in the VST Mixer you will find two small indicator buttons, marked "FX" and "EQ". Click either one to open the Channel Settings panel for any of the channels. In each of the Channel Settings panels is a duplicate of the channel module on the Mixer, along with controls for effects and equalization.
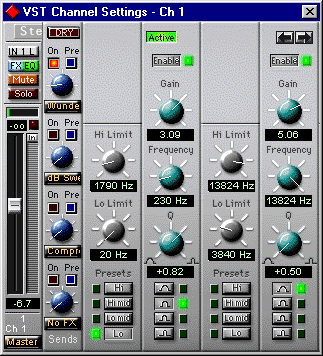
The eq section is a four-band parametric type. Two bands are shown by default; if you need more, click the arrow in the upper right. Click the Active button, and click the Enable button for each band you use. The controls marked "Hi Limit" and "Lo Limit" constrain the selectable range of center frequencies for the eq. The Q control affects bandwidth; that is, the range of frequencies affected, spreading upwards and downwards from the center frequency. The Frequency control determines the center frequency affected, and the Gain control determines the amount of boost or cut. Note that adjustments to equalization should be done with caution, as boosting the gain of a band will increase the overall volume of the track.
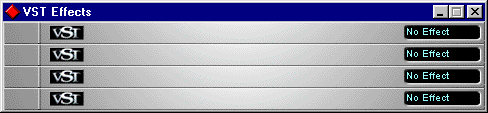
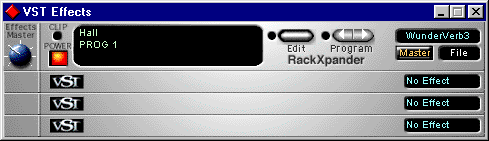
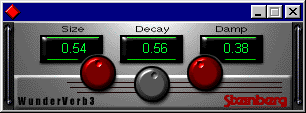
Effects can be applied to each track independently, just as you would use your auxilliary sends on a physical mixing console. The effects available for use will be determined by the plug-ins you have installed in the Vstplugins folder, in the Cubase Score VST folder. To activate a plug-in, select Effects from the Audio menu. Right-click on one of the black areas marked "No Effect", on the right side of the panel. Select a plug-in from the pop-up menu and hit the "Power" switch. Bring up the Effects Master (blue knob, left side) about halfway. Each plug-in will provide its own set of parameters for you to adjust to your liking. Having selected up to four plug-ins, close the VST Effects panel and return to the Channel Settings panel. For each effect you wish to apply to the channel, click the "On" switch and gradually bring up the blue volume knob. Effects can be applied pre-eq by clicking the "Pre" switch.
Top
Automated Mixdown
Theoretically the Write and Read functions enable you to record and reproduce your movements within the program while mixing. I have found the Read function to be unreliable in real-time mode. Nevertheless, it could not be much simpler. Just click the "Write" button in the upper left corner of the Mixer before starting playback, and click it again when the mix is over. Read back your mix by clicking the "Read" button before starting playback.
Top
Export Audio
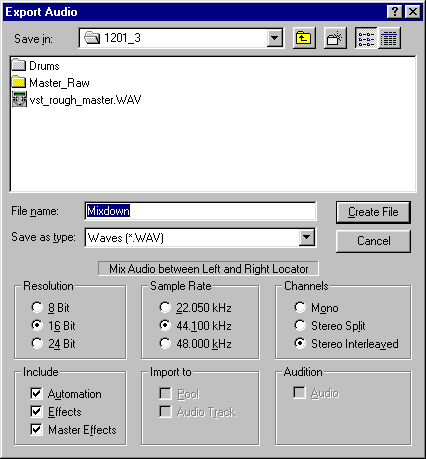
Of course, you can route your sound card output to a tape recorder or other device to capture the mix. But mixing directly to a digital audio file keeps the sound in the digital domain, thus avoiding the degrading effects of digital-to-analog conversion.To mix your tracks to your hard disc, first ensure that the locators are positioned properly. In the Arrangement window, use the horizontal slider (lower right) to expand the track view. Hold down the left mouse button on the black horizontal ruler at the top of the window, and drag towards the left, to the start of the track. This sets the left locator. Hold down the right mouse button on the ruler and drag towards the right, until it is just beyond the limits of any of the red track bars. This sets the right locator.
Once this is done, click the "Create File" button on the VST Master panel. You can select from a number of interesting options in the Export Audio dialog, most of which are a matter of preference. When Include Automation is selected, the changes you have made to the mix in Write mode will be reflected in the rendered file.
Before closing Cubase, save your work in the native formats. Most importantly, save the entire "song" in the .all format. Do this periodically as you work so as not to lose any of your revisions.
The mix file rendered by Cubase will probably require some editing. For this, you can open the file in Cool Edit Pro and perform any transforms. In all liklihood you will want to trim the head and tail, perhaps limit some of the peaks, amplify the track if the level is too low (though rendering the mix again would be more advisable), apply an envelope to the tail (especially for a fade-out), and add about a half second of silence to the head and tail, in that order. You should then save the revised mix with a new name, and delete the original, as CEP sometimes tends to corrupt files it overwrites.
Top
Troubleshooting
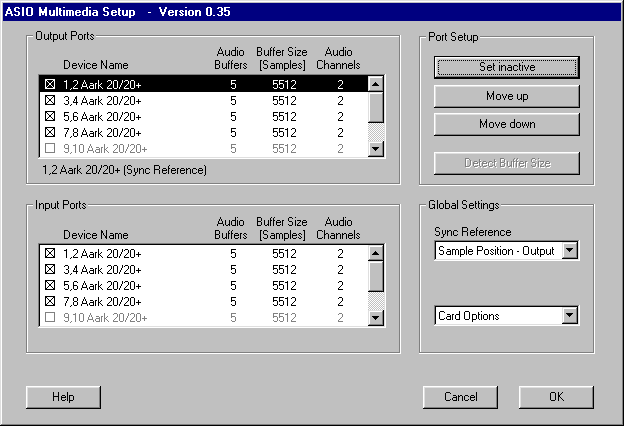
If you are getting no sound in Cubase, first ensure that your sound card is properly set up for audio playback. Having ruled out improper connections or routing, from the Audio menu in Cubase, select System. From the Audio System Setup dialog, ensure that an ASIO driver is available. Click the ASIO Control Panel button and ensure that the sound card you wish to use is active in the Output Ports section (it should be marked with an X). Highlight the device by clicking on it once, and click OK. Click OK again to close the Audio System Setup dialog. Refer to the Steinberg KnowledgeBase for more information.
Top
Digital Audio Guide